To make long rods more manageable during the installation and shipping process, longer rods can have splice points where two or more smaller rods connect to create one larger rod. It’s perfect for wide windows or doors where you want to eliminate sagging and give the appearance of one, seamless rod.
How to Place Brackets on Spliced Rods:
We highly recommend having your brackets line up with the splice seams on the rod. This benefits you in three ways:
- It hides the seam. The seam on any spliced curtain rod is already very small, but by placing it behind a curtain bracket you eliminate the chance of it ever being seen.
- It also means that you will never have to slide your curtains or curtain rings over a seam, which can sometimes cause the curtains to get stuck or not slide as easily as they should.
- Lastly, it gives you additional support at the splice point so you are not sacrificing any strength across the entire rod.
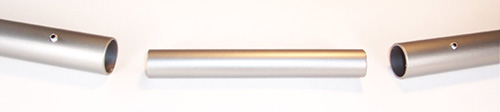
The Components of a Spliced Rod:
- Set screws - each curtain rod segment will have set screws at the end of it. These set screws will be use to secure the splice connector inside the rod and properly secure the two pieces together.
- Splice connector - the splice connector is a piece with a smaller diameter than your curtain rod, roughly 8” to 10" long, that slides into the rod segments.
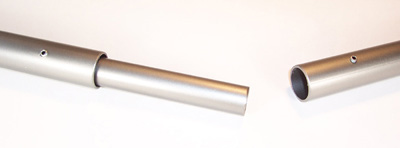
Splice Assembly Steps:
The end of each rod segment has a set screw for securing the splice. You'll find the set screw on the back of the rod approximately 2" from the end. The splice connector is a smaller diameter piece of rod, about 8" to 10" long.
1. Slide splice halfway into first rod.
2. Tighten set screw.
3. Repeat with second rod.
4. Rotate rods so screws face the wall.
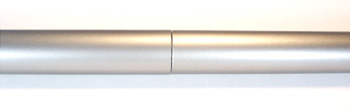
Once installed, only a thin seam remains which will be completely hidden behind the middle bracket, making the rod appear as a continuous, seamless rod—ready to be finished with your choice of drapery finials.