General Tips
We recommend hiring a professional to install your drapery hardware. If you would like to do it yourself, however, here are some helpful installation tips:
- Grab a ladder, pencil, level, ruler, drill and screwdriver.
- Keep in mind that walls, ceilings, and floors can be uneven, particularly in older houses. Despite what your level says, if it looks straight, it is straight.
- Make sure you have the appropriate wood screws and/or anchors.
- Wood screws are included with each order. Our wood screws are #8 diameter x 2” in length. Wood screws are intended to be mounted into wood such as a stud or header. Do not use wood screws to mount into hollow drywall, plaster, or other surfaces without appropriate anchors. This is unsafe and will not securely or reliably support your hardware.
- The 3/16” SnapToggle anchors sold on our site are for use in hollow drywall, plaster, and other surfaces. They are to be used with the 10-24 x 2 ½” machine screws we provide. Please see below for installation instructions. Click here to purchase.
- If you would like to paint the color of your screw heads, we recommend using paint pens, nail polish, spray paint, or even a Sharpie. See more here.
- It is important to note that mounting situations can vary (such as space behind your wall) and we cannot guarantee that the length of screws provided will work for your installation. If they do not, please find appropriate length screws at your local hardware store.
- A few general rules of thumb: End brackets will typically be installed 4" to 12" outside the window/door frame. They can be at the end of the rod or a few inches toward the middle as you may want to leave room for a ring or two on the outside of the bracket. You’ll typically want your drapery to hang about 1" off the floor. If it touches the floor that is fine, just try to avoid "pooling".
- If you are using a middle bracket, install your end brackets first. Using the ceiling and/or your window/door frame as reference points, mark with a ruler and pencil where the screws should be drilled for the end brackets. Once the end brackets are installed, place your rod in the end brackets and have someone hold the rod so that it is level, then mark with your pencil where holes should be drilled for the center bracket.
- Our rods should not slide in the brackets, but in the unlikely event they do, a simple trick is to place a thin piece of duct tape inside the bracket cup. It will create friction for the rods and will not be visible.
- If attaching rings to the eyelets using drapery pins, make sure to place the drapery pin so that you cannot see the eyelet when the drapery is hanging.
- If you are using rings from a third party or grommets and they are getting stuck on a seam, a simple trick is to put a clear piece of "teflon tape" on the top of the rod. The best tape we've found is a "Wear-Resistant Slippery UHMW" (Ultra High Molecular Weight) polyethylene tape. You can get it from McMaster-Carr. You'll want the .007" thickness, clear tape. Anything thinner may tear apart, anything thicker is overkill.
SnapToggle Installation Instructions
- SnapToggle heavy-duty toggle bolts carry twice the load in a smaller hole than standard wing anchors. A patented strap design with sturdier straps and smaller ratchet interval adjusts more precisely and snaps off flush to the surface. SnapToggle heavy-duty toggle bolts do NOT spin when installed with a screw gun and provide superior holding with metal-to-metal fastening.
- Applications: Cinder block, concrete block, gypsum board, drywall, tile over drywall, plasterboard, composite panels, cement board, greenboard, plaster, stucco, fiberglass, plywood, steel plate, plastic, and wood studs / beams.
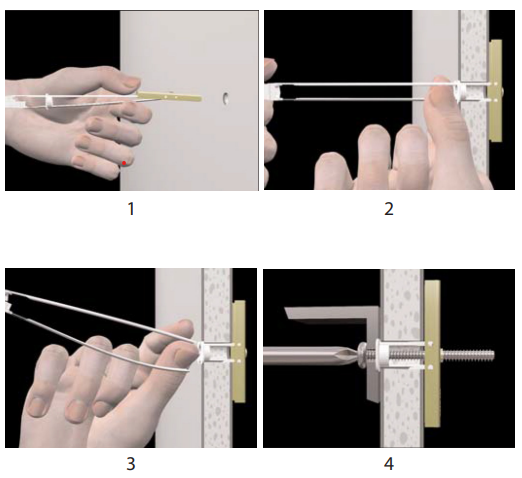
- To install:
- Drill ½” size hole. Hold metal channel flat alongside plastic straps & slide channel through the hole. Minimum clearance behind wall: only 1-7/8".
- Hold ends of straps together between thumb & forefinger and pull toward you until channel rests behind wall. Ratchet cap along straps with other hand until flange of cap is flush with wall.
- Place thumb between straps at wall. Push thumb side to side, snapping off straps level with flange of cap.
- Place item over flange. Insert bolt and tighten until snug against item, then stop. Use machine screw or bolt to match thread in metal channel.


